Simple two VM setup
Configuring your custom development environment requires building a Stack Template file. As you configure your stack file, you can add the number of machines required, set the machine types, and choose what applications/packages to be installed on each VM.
While you can setup all that using the visual interface, understanding your Stack template YAML file is a great advantage which will give you more control on the development environment VMs or the Stack you are creating.
Example
Let’s create a stack setup with 2 AWS Micro VMs to learn more about stack templates:
- Apache & PHP server
- MySQL server Go ahead and start a new stack, and in the installed services screen, check the below options:
Full Stack
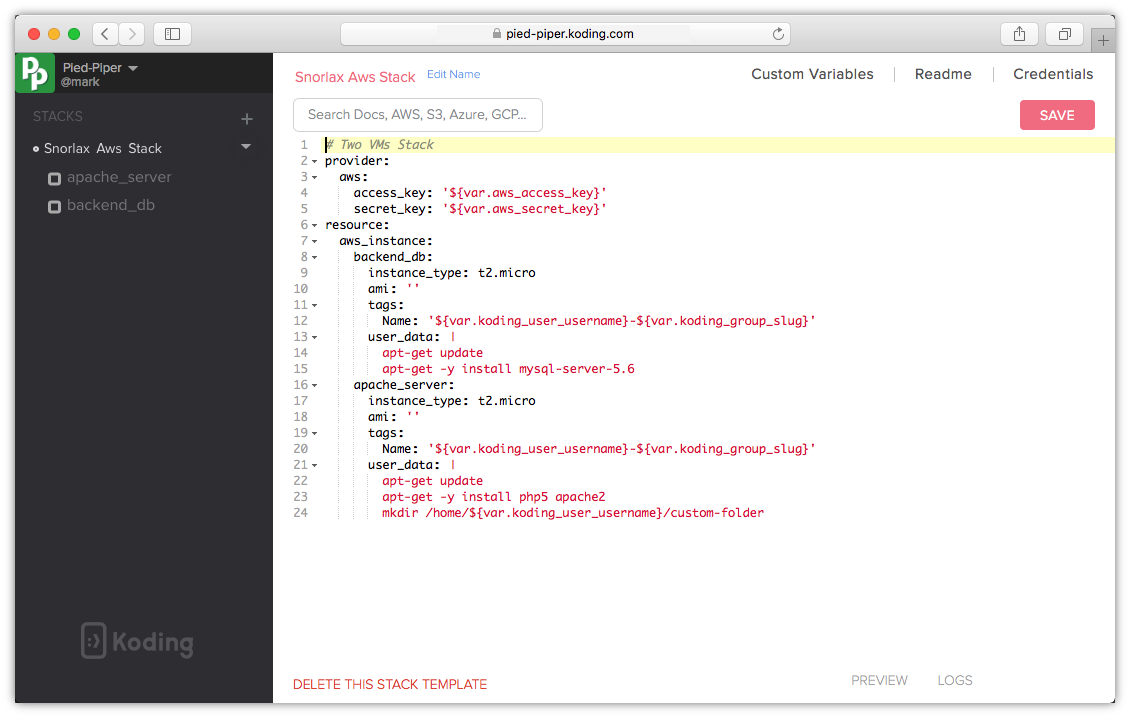
Here is the Full Stack Template file we will use, we modified the default stack template and added commands under the user_data section for both VMs to install the required packages:
# Two VMs Stack

provider:
  aws:
    access_key: '${var.aws_access_key}'
    secret_key: '${var.aws_secret_key}'
resource:
  aws_instance:
    backend_db:
      instance_type: t2.micro
      ami: ''
      tags:
        Name: '${var.koding_user_username}-${var.koding_group_slug}'
      user_data: |-
        apt-get update
        apt-get -y install mysql-server-5.6
    apache_server:
      instance_type: t2.micro
      ami: ''
      tags:
        Name: '${var.koding_user_username}-${var.koding_group_slug}'
      user_data: |-
        apt-get update
        apt-get -y install php5 apache2
        mkdir /home/${var.koding_user_username}/custom-folder
Stack file sections
Let’s look at the auto generated Stack Template file parameters
1. Provider Section
In this example we are using AWS Stack, but you can use any cloud provider you wish. The provider section is auto generated and will be different according to the cloud provider you chose to create your stack with.
# Here is your stack preview
# You can make advanced changes like modifying your VM,
# installing packages, and running shell commands.

provider:                                # Starts with the header name "provider:"
  aws:                                   # Provider source, in our example it's AWS
    access_key: '${var.aws_access_key}'  # Your access key (pulled from the credentials you provided)
    secret_key: '${var.aws_secret_key}'  # Your secret key (pulled from the credentials you provided)
2. Resources section
resource:                                            # Starts with the header name "resource:"
  aws_instance:                                      # All VMs are AWS Instances
    example_1:                                       # First VM name
      instance_type: t2.micro                        # First VM type
      ami: ''                                        # AWS AMI
      tags:                                          # Tags
        Name: '${var.koding_user_username}-${var.koding_group_slug}'
      user_data:                                     # Commands to run when the VM boots goes here
    example_2:                                       # Second VM name
      instance_type: t2.micro                        # Second VM type
      ami: ''                                        # AWS AMI
      tags:                                          # Tags
        Name: '${var.koding_user_username}-${var.koding_group_slug}'
      user_data:                                     # Commands to run when the VM boots goes here
Modifying the Stack Template file
When you create a stack a default stack template is created for you. We edit the Stack Template file to change the VM names and add the command lines to run when our VMs are generated and booted.
Check the changes we made to the Stack Template file:
First VM name changed from “exmaple_1” to “backend_db”:
resource:
  aws_instance:
    backend_db:     #originally: "exmaple_1"
      instance_type: t2.micro
      ami: ''
      tags:
We are going to run multiple commands, using pipe and dash “|-“ permits multiline. We run ‘apt-get update’ first, then install mysql server:
user_data: |-
        apt-get update
        apt-get -y install mysql-server-5.6
Second VM name changed from “exmaple_2” to “apache server”
apache_server:     #originally: "exmaple_2"
      instance_type: t2.micro
      ami: ''
      tags:
Again we use pipe and dash “|-“ to write multiline commands for our second VM “apache_server”.
We run ‘apt-get update’, install apache & php5 and create a folder called “custom-folder” in the user home directory using the variable that holds the user name _${var.koding_user_username}_
user_data: |-
        apt-get update
        apt-get -y install php5 apache2
        mkdir /home/${var.koding_user_username}/custom-folder
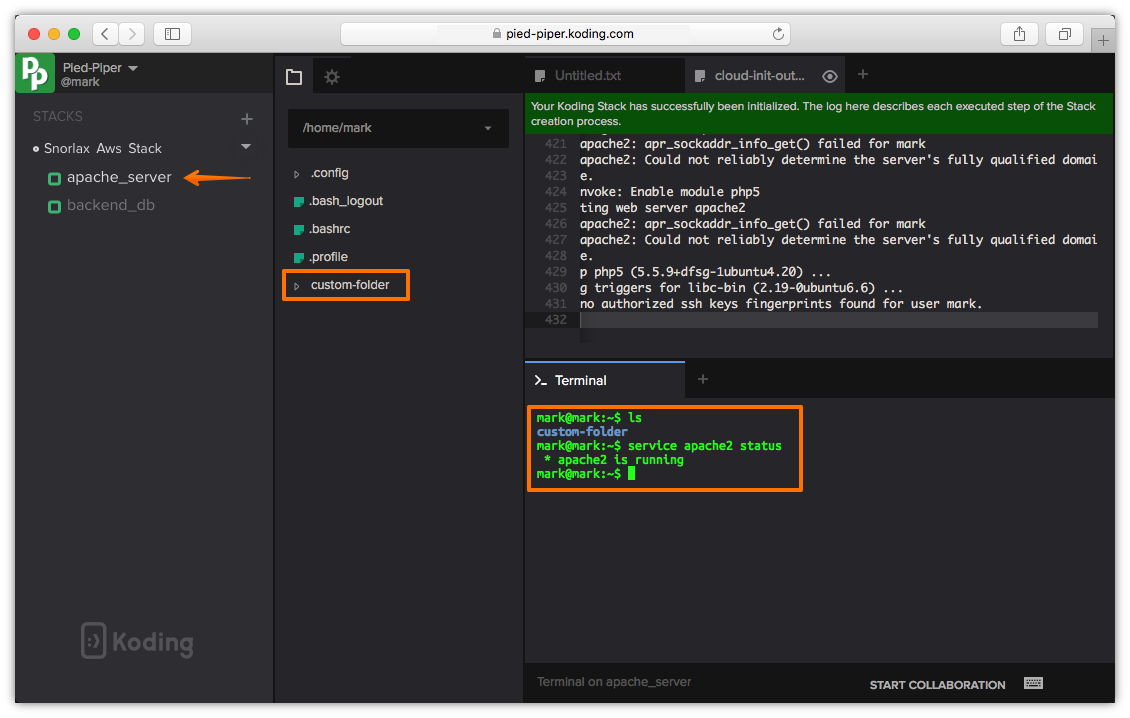
If we check our apache VM now, we can see that the apache is running and the custom-folder was created in the user home folder successfully. You may also check your VM IP and use your browser to open the default apache served page.
Happy Koding!